


Виртуальная USB-клавиатура из Arduino
Связь с компьютером может выполнить простая система на основе Arduino, чтобы получить доступ к широкому кругу устройств и информации. Большинство радиолюбителей связывают Arduino с помощью последовательной связи (USB-соединение).
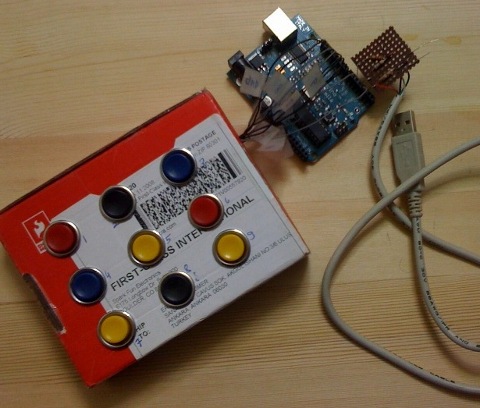
Значит можно использовать Arduino для подключения пользовательского устройства ввода к компьютеру, так что он будет эмулировать клавиатуру или джойстик.
Необходимые детали
1шт-Arduino Duemilanove, Arduino Pro, Seeeduino, или эквивалент
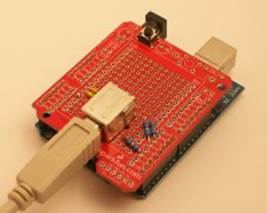
1шт-USB разъем "Мама"
1шт-USB-к-B кабель (обычно используется в качестве кабеля для принтера и для Arduino)
2шт-3,6 стабилитроны (должен быть рассчитан на 0,5 Вт или меньше, 1W не будет работать)
1шт-2K2 резистор
1%: красный-красный-черный-коричневый коричневый
5%: красно-красно-красно-золотой
2шт-68R резисторы
1%: сине-серо-черный-золото-коричневый
5%: сине-серо-черный-золото
4шт-SPST (однополюсные)

Принципиальная схема
Программный Код VirtualUsbKeyboard
/**
* VirtualUsbKeyboard
*
* Enumerates itself as a HID (Human Interface Device) to a host
* computer using a USB shield. The Arduino then appears to the host to
* be a USB keyboard and keypress events can be sent on demand.
*
* This example watches the state of 6 push buttons and when a button
* is pressed it sends a matching keypress event to the host.
*
* Copyright 2009 Jonathan Oxer <jon@oxer.com.au>
*
* This program is free software: you can redistribute it and/or modify
* it under the terms of the GNU General Public License as published by
* the Free Software Foundation, either version 3 of the License, or
* (at your option) any later version. http://www.gnu.org/licenses/
*
*/
// Requires the use of the "UsbKeyboard" library available from
//
#include "UsbKeyboard.h"
// Define the inputs to use for buttons
#define BUTTON_A 6
#define BUTTON_B 7
#define BUTTON_C 8
#define BUTTON_D 9
#define BUTTON_MSG 10
#define BUTTON_ENTER 11
// Use the on-board LED as an activity display
int ledPin = 13;
/**
* Configure button inputs and set up the USB connection to the host
*/
void setup()
{
// Set up the activity display LED
pinMode (ledPin, OUTPUT);
digitalWrite (ledPin, HIGH);
// Set the button pins to inputs
pinMode (BUTTON_A, INPUT);
pinMode (BUTTON_B, INPUT);
pinMode (BUTTON_C, INPUT);
pinMode (BUTTON_D, INPUT);
pinMode (BUTTON_MSG, INPUT);
pinMode (BUTTON_ENTER, INPUT);
// Enable the CPU's internal 20k pull-up resistors on the button
// inputs so they default to a "high" state
digitalWrite (BUTTON_A, HIGH);
digitalWrite (BUTTON_B, HIGH);
digitalWrite (BUTTON_C, HIGH);
digitalWrite (BUTTON_D, HIGH);
digitalWrite (BUTTON_MSG, HIGH);
digitalWrite (BUTTON_ENTER, HIGH);
// Disable timer0 since it can mess with the USB timing. Note that
// this means some functions such as delay() will no longer work.
TIMSK0&=!(1<<TOIE0);
// Clear interrupts while performing time-critical operations
cli();
// Force re-enumeration so the host will detect us
usbDeviceDisconnect();
delayMs(250);
usbDeviceConnect();
// Set interrupts again
sei();
}
/**
* Main program loop. Scan for keypresses and send a matching keypress
* event to the host
* FIXME: currently repeats as fast as it can. Add transition detection
*/
void loop()
{
UsbKeyboard.update();
if (digitalRead(BUTTON_A) == LOW) {
UsbKeyboard.sendKeyStroke(KEY_A);
digitalWrite(ledPin, !digitalRead(ledPin)); // Toggle status LED
}
if (digitalRead(BUTTON_B) == LOW) {
UsbKeyboard.sendKeyStroke(KEY_B);
digitalWrite(ledPin, !digitalRead(ledPin)); // Toggle status LED
}
if (digitalRead(BUTTON_C) == LOW) {
UsbKeyboard.sendKeyStroke(KEY_C);
digitalWrite(ledPin, !digitalRead(ledPin)); // Toggle status LED
}
if (digitalRead(BUTTON_D) == LOW) {
UsbKeyboard.sendKeyStroke(KEY_D);
digitalWrite(ledPin, !digitalRead(ledPin)); // Toggle status LED
}
if (digitalRead(BUTTON_MSG) == LOW) {
UsbKeyboard.sendKeyStroke(KEY_H, MOD_SHIFT_LEFT);
UsbKeyboard.sendKeyStroke(KEY_E);
UsbKeyboard.sendKeyStroke(KEY_L);
UsbKeyboard.sendKeyStroke(KEY_L);
UsbKeyboard.sendKeyStroke(KEY_O);
UsbKeyboard.sendKeyStroke(KEY_SPACE);
UsbKeyboard.sendKeyStroke(KEY_W, MOD_SHIFT_LEFT);
UsbKeyboard.sendKeyStroke(KEY_O);
UsbKeyboard.sendKeyStroke(KEY_R);
UsbKeyboard.sendKeyStroke(KEY_L);
UsbKeyboard.sendKeyStroke(KEY_D);
UsbKeyboard.sendKeyStroke(KEY_ENTER);
digitalWrite(ledPin, !digitalRead(ledPin)); // Toggle status LED
}
if (digitalRead(BUTTON_ENTER) == LOW) {
UsbKeyboard.sendKeyStroke(KEY_ENTER);
digitalWrite(ledPin, !digitalRead(ledPin)); // Toggle status LED
}
}
/**
* Define our own delay function so that we don't have to rely on
* operation of timer0, the interrupt used by the internal delay()
*/
void delayMs(unsigned int ms)
{
for (int i = 0; i < ms; i++) {
delayMicroseconds(1000);
}
}
Виртуальная USB-клавиатура


